I am not a seamstress. I have, in the past, sewn a few pieces – an Elvis bowling shirt, curtains, Halloween costumes – but none of them was perfect. While I have the basics skills of sewing and I have all the necessary tools for it, the reason I’m not fabulous at it is that I’m just plain lazy.
So when I was looking up “easy” ways of making a slipcover, I didn’t actually find any instructions that were as easy as I was hoping for. The ones I found had you pulling apart the current slipcover, measuring the panels, working from a pattern, or cutting out the six faces of the seat cushion and sewing a million seams and adding piping. Here’s the thing: This is for a rustic cabin. I don’t want anything too fancy. Not to mention, the more complicated the work is, the easier it is to end up with a messy final product. And the material I was working with has stripes so there is the added work of trying to get everything to line up so it doesn’t look crooked or lopsided or asymmetrical.
I found one blog post that gave me a good idea of how to do a slipcover for a sofa bed, which is what I was trying to cover and it actually worked perfectly.
It took me many, many days of putting this together. It would have been lovely to simply set up shop at the cabin and sew my little heart out. But there is no electricity and I’m not renting a generator for a sewing machine. So I brought the cushions home first, finished them, brought them back to the cabin and made sure they looked alright. Then I fitted some more fabric over the back and bottom. Then I brought that home and put it together. Then I brought that section out and made sure it was alright. I kept adding pieces like that. I figured if I fitted it all together in one go, all it would take is one wrong seam and the whole thing would have to be taken apart and redone. I’d rather take my time and do it right.
A word on the fabric I chose. I opted for an outdoor fabric, designed for patio furniture and boats. It is cotton but has a protectant in it that makes it dirt and water resistant. Perfect for a cottage. It isn’t exactly soft but it is cool when sitting on it which will make it very comfortable to sit on in summer. In winter, we will just throw lots of blankets on it to make it cozy. Outdoor fabrics also have far more brilliant colours and interesting patterns than conventional indoor upholstery fabrics. The fabric I chose was typical in price but because Fabricland was having a store-wide 50%-off sale, I was able to get this fabric for $10 a metre instead of $20. And when you need to buy 9 metres of fabric, that’s a HUGE savings! The sales girl mentioned that I should only need around 6-8 metres for a slipcover but I opted for 9 to be on the safe side. If I have extra, I can use it to make outdoor cushions, do repairs or create decorative accents.
The Seat Cushions
In the end, I just took a leap of faith and started fitting and sewing. Don’t follow my instructions step-by-step. I’m assuming that if you are actually reading this to learn how to make a slipcover, then you already have more sewing experience than I do and you’ll know what needs to be done when. But it ended up being quite simple and it looked good so that’s all that matters.
First, I set the seat cushion in the fabric and wrapped the fabric around it inside out. I lined up the stripes so that I knew the stripes were straight. I pinned the fabric together down the sides and trimmed the fabric on three sides into a workable size.

I imagined the easiest way to do corners was to simply fold the fabric in on itself as you do when wrapping a present but I didn’t know how to do it. I found a few tutorials online on how to do “boxed corners”. I only found these on sites explaining how to make totes and bags but there was no reason why this type of corner couldn’t work on a slipcover.
I sewed the sides straight down, from the wrapped end of the fabric to the end that would eventually have the zipper. Then I fitted the slipcover on to the cushion. If you stand the cushion upright, the fabric naturally bends into a triangle at the corners. I used a straight edge pressed up against the corner of the cushion to draw the line I was going to sew.
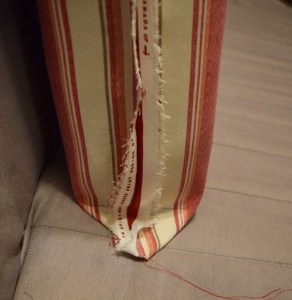

I removed the slipcover and then sewed a straight line across the triangle. To finish the corner, I cut off the excess fabric.

Turning the slipcover right side out and fitting it over the seat cushion again, I had wonderful corners that were very easy to make.

While the slipcover was on, I pinned the zipper in as well. I used standard sewing practice for the zipper. I hate working with zippers but it is what it is. Making buttons is even more work so a zipper it is. Did I mention I was lazy?

As it turned out the zippers were a little short. I bought the longest ones I could find but I still have to fold the cushion in half to get it in. I opted for zippers that come apart at the ends and that gave me another inch or so of space to work with.
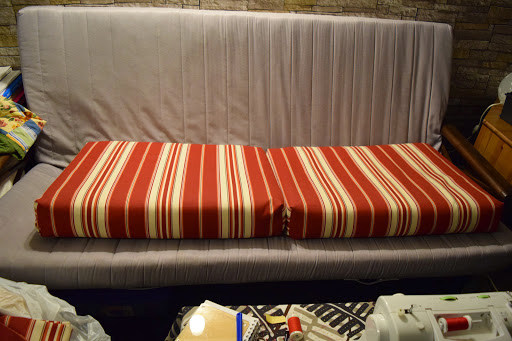
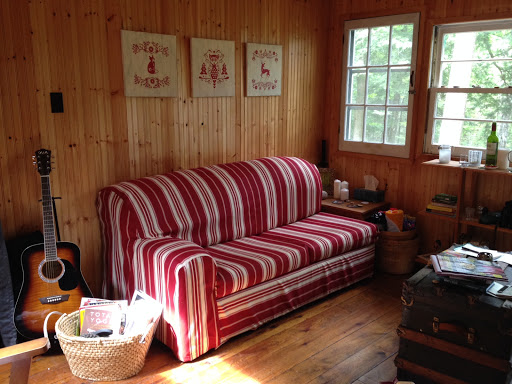
Here are the two finished cushions. (This is the old futon couch in our basement, not the one at the cabin.) I would love to say that I had the foresight to have actually planned on the stripes being centred but that was just dumb luck.
The Bottom of the Sofa Bed
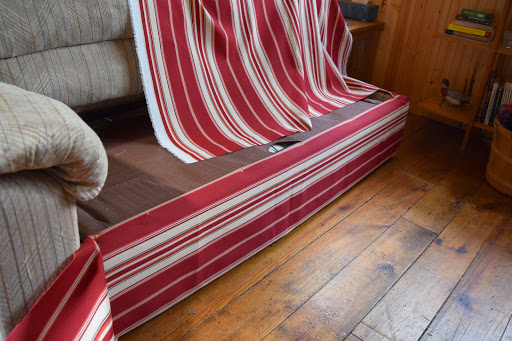
I staple-gunned a piece of velcro along the entire top edge of the sofa as well as under the bottom edge. The mate of this velcro was sewn to the fabric and now the sofa is covered on the bottom but the slipcover can be easily removed for washing.
The Back of the Sofa
 |
| The stripes don’t match up in this photo because the cushions aren’t pushed in as far as they should be. |
After that, I pulled the material taut, folded a seam under the inside of the frame and pinned it. Another 5′ piece of velcro was stapled along the bottom of the inside of the frame and the mate was sewn onto the fabric. This means the back section of the slipcover will still be held in place while the bed is in use. I decided not to velcro the slipcover to the bottom of the back of the sofa. I didn’t feel it necessary since it would be against a wall. Back at home, I sewed the centre seam and hemmed all the edges, sewing the velcro to the edges that would be attached to the sofa frame.
 |
 |
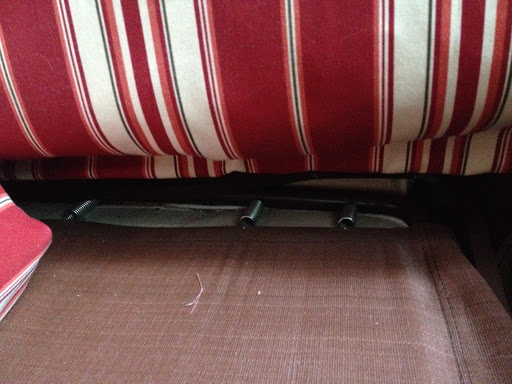
| The velcro at the bottom of the cushions and around the frame allow the sofa bed to be used while the slipcover is still on. |
The Sides and Arm of the Sofa
The side and arm of this sofa was the hardest thing about it. Especially because I had only two metres left of fabric and I was a little worried about making a costly mistake.
Because the sofa is asymmetrical, the standard practice of fitting fabric inside out over the sofa and pinning it, could not happen. So it was a long and laborious act of pinning on the right side and then at home, unpinning and sewing on the underside. But it all worked out.
The sides also had velcro sewn on to the bottom hem as well as on the inside of the sofa bed where the slipcover would attach to the inner frame. This also saved me a couple metres of material because most slipcovers have to cover the flat part under the cushions as well.
I can’t tell you exactly how I did the sides and arms. I realized at this point, I was really out of my league in terms of upholstery design and construction. I pinned and then drew an outline in pencil and then pinned and made a few guesses and took a leap of faith and in the end, the arm and sides actually turned out alright.
And then the cat claimed it.
 |
| Mine. |

2 thoughts on “Making My First Slipcover”