I had such big plans for this summer. But they all got pushed to the side in favour of swimming and lounging in the hammock and reading and playing guitar. We were going to rip everything out of the Third Room (which we did) and then insulate (we have the insulation in our possession) and then refinish pallet wood for the ceiling (pallets are still whole in our garage) and then install a tiny wood stove (still in the shed) and then…
Yeah. Not so much.
To be fair, the plan we had in the spring turned into something else in the summer. And then in the summer, we had someone who knows something about construction take a look and tell us a whole lot of new things about the cabin that we weren’t expecting and so everything came to a bit of a standstill as we digested all the new information, re-evaluated and kept planning. And then it was time for Soldier Boy to go under the knife again to have his ankle repaired and that was the end of the summer for our tiny cabin.
But one thing did get pretty much done in the month I stayed out there. The patio. It’s not completely finished. But it’s ALMOST finished. Which, right now, is something to be proud of.
The land where our cabin is situated is very rocky and has a lot of varied terrain, which makes it wild and rugged and beautiful but hard to build on. So one corner of the cabin is pretty much on the ground and the other three are at varying heights. The “front” door exits on the side of the cabin that is level with the ground so when we first got the cabin, there was nothing there except a few standard, inexpensive, concrete squares as a simple pathway.


But over the cold winter months, over a few hundred bottles of red wine and millions of hours on Pinterest, I decided to build a beautiful stone patio worthy of Middle Earth, the ones you see in cottage magazines. The ones people pay thousands of dollars for. But I would create mine for FREE!
I told family and friends that I was looking for flat stones – flagstone, broken patio stones, etc. Slowly, over time, I gathered a large enough collection of them to begin. I even took these old square ones and dropped a large rock in the centre of them so that when they shattered, they created some interesting shapes.
It became like a puzzle. Like tetris. I wanted it to look random but still have balance between shapes and colours. No two of the same stones beside each other and not too many of one shape or col. It helped that I only collected enough at a time to do the patio in sections. So the first section has large white stones that we actually had in our garage from a previous house. The next section has more square stones since they all came together from the same source.


I started by simply placing the stones where I thought they fit and looked good. (In retrospect, I should have left more space between the stones.)
Then I dug out the earth and placed the patio stones in it. If you are able to do the entire patio all in one go, you would dig out and level the entire area first, place all the stones in and then finish with the dirt overtop. I did it one small section at time because I knew I didn’t have enough stones to do a large part at any one time, I was on my own doing this with only a rake and a trowel and because there was often many days between work that it still needed to be safe enough to walk on.
When I was finished one section, I packed the earth around it and “grouted” the stones with topsoil that I pressed down between the stones. Because of the rocky composition of the earth and the proximity of two massive trees, digging was a long and arduous job. The rocks I dug out were like icebergs – I thought I would only have to remove a pebble and I ended up creating a hole the size of a softball! And the roots! So many roots to work around! I ended up hacking a few into a sappy mess to get the stones in and level. (Don’t worry, the trees are massive and aren’t going to miss one or two of their tiny roots.)
As the last summer and this summer progressed, I gathered more flat stones from friends, family, found debris on the street or at construction sites and Home Depot. Yes, Home Depot puts their broken patio stones on the curb and I happen to have family that works at the local Home Depot and I would get a text saying that a pallet of broken stones had arrived. They go quickly, so once I got the text, I had to move. These stones are often all of one type and colour but since they are all broken and unusable in professional-looking landscaping, they are perfect for the random, more organic look I was going for as long as I interspersed other stones between them.

This summer I was able to get almost all the way to where we want the wooden deck to start. At the deck end of the patio, the ground was much lower than the other end where the door is. I bought bags of topsoil and dumped them there to raise the stones the level of the earth and then placed the stones on top.
To make my Middle Earth patio complete, I went to my favourite nursery, Hillside Gardens, in Perth and had a great discussion with two ladies there about whether moss or thyme would be best to grow between the stones. Moss grows in shade and is fairly drought-resistant (which was really important this year) and thyme loves sun and is also fairly drought-resistant. Next year, we’d like to extend the roof over the patio which makes moss the better choice since it grows in shade but I’ll definitely need to water it since it won’t be getting any rain.
I bought and planted both this summer to see which flourished where since some of the patio currently gets afternoon sun and some is always in shade. The best part about moss is that it can easily be peeled off nearby rocks and transplanted. Since we have massive rocks near the cabin, there is moss everywhere. Something else that’s free!


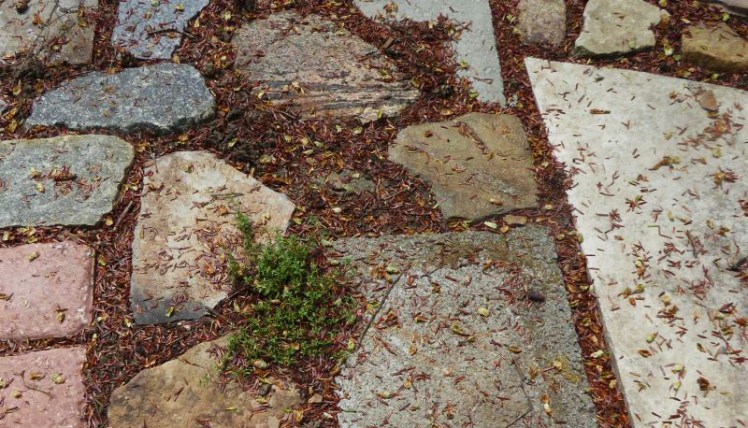
I went back into the city for a few days after that and then we were out of town so it weren’t able to get back out to the cabin for about a week. When we returned, it was the day after the first rain in almost three months and I was struck by how beautiful the colours of the stones were. When I was working with them and digging holes and grouting them, the stones were of course very dirty. And now that I could see what they really looked like, I was happy with the “randomness” of the colours and shapes. The vibrant green of the thyme and moss really add colour and texture to it as well. And considering all the surface variations in the stone and how difficult it was to level some of them, it turned out very smooth and comfortable to walk on.

We haven’t been back to the cabin for a few weeks now but sources tell me the moss and thyme are still alive! I’m excited to see how much they grow next year.
Next year, we extend the roof, we finish the deck and then I can put the final touches on the deck side of the patio. We also have a new window to install that opens out onto the patio and the plan is to have a small table and chairs on the patio to enjoy the outdoors even in the rain.


It is truly lovely. We were delighted to see in person how lovely it looked and all the new deck too. All the hard work you two are doing is paying off.
LikeLike
That looks great and I love the randomness of the stones you used. Your persistence and hardwork paid off. Great job!
LikeLike
Thanks! It took a long time but now I’m happy every time I step outside. 🙂
LikeLiked by 1 person